WireGuard has become a popular VPN protocol due to its simplicity and security. I created this guide because as a non-Linux administrator and non-network professional, I found it quite difficult to find correct and complete instructions on how to set up my own VPN with WireGuard. The official documentation didn’t help me much in this either.
WireGuard Server and Client
The goal here is to set up a WireGuard server on Ubuntu Server 20.04 LTS and two clients, one each on macOS and iOS. Also, the WireGuard VPN we’ll go to set up should allow connections with both IPv4 and IPv6. The WireGuard server will be responsible for accepting connections from the clients, so it’s best to assign this role to a computer with a stable and decent network connection. I’ll run the WireGuard server on a small cloud VPS instance. Therefore, all of my other devices, such as my MacBook and iPhone, are the clients in this setup.
With WireGuard you need to assign static IP addresses for all devices in the VPN network. So let’s start with this:
| Device | IPv4 | IPv6 |
|---|---|---|
| Server | 10.0.0.1 | fd00::1 |
| MacBook | 10.0.0.10 | fd00::10 |
| iPhone | 10.0.0.20 | fd00::20 |
Install WireGuard on server
On the server we start with the installation of the software. But before we continue, let’s ensure everything is up to date:
sudo apt update && sudo apt upgrade
sudo reboot
Fortunately Ubuntu Server 20.04 LTS already comes with everything we need.
sudo apt install wireguard
Since WireGuard requires its kernel module to be loaded, we should ensure this is the case:
sudo modprobe wireguard
With the following command you can verify the kernel module is successfully loaded:
lsmod | grep wireguard
Generate the keypair for encryption
We start by generating the the keypair for encrypting the connections.
sudo su -
cd /etc/wireguard
umask 077
wg genkey | sudo tee privatekey | wg pubkey | sudo tee publickey
The /etc/wireguard directory should now contain two files, with both the private key (privatekey) and public key (publickey).
Create WireGuard server configuration
Now that the WireGuard software is installed on the server, and the keypair for encryption is generated, we can start configuring the server.
If not told otherwise, WireGuard will look for a configuration file associated with the corresponding network interface in /etc/wireguard. Since I decided to name the network interface used for WireGuard wg0, the corresponding configuration file would be /etc/wireguard/wg0.conf — so let’s create it:
touch /etc/wireguard/wg0.conf
The next step is to open and edit the configuration file with the editor of your choice. Make sure to replace all four instances of ens2 with the name of your network interface which is connected to the internet. If you are unsure, you can look up the correct name with the command ip link show or ifconfig.
[Interface]
Address = 10.0.0.1/32,fd00::1/128
PostUp = sysctl -w net.ipv4.ip_forward=1 && sysctl -w net.ipv6.conf.all.forwarding=1 && iptables -A FORWARD -i %i -j ACCEPT; iptables -t nat -A POSTROUTING -o ens2 -j MASQUERADE; ip6tables -A FORWARD -i %i -j ACCEPT; ip6tables -t nat -A POSTROUTING -o ens2 -j MASQUERADE
PostDown = iptables -D FORWARD -i %i -j ACCEPT; iptables -t nat -D POSTROUTING -o ens2 -j MASQUERADE; ip6tables -D FORWARD -i %i -j ACCEPT; ip6tables -t nat -D POSTROUTING -o ens2 -j MASQUERADE && sysctl -w net.ipv6.conf.all.forwarding=0 && sysctl -w net.ipv4.ip_forward=0
ListenPort = 51820
PrivateKey = <Server Private Key>

[Peer]
PublicKey = <First Client Private Key>
AllowedIPs = 10.0.0.10/32,fd00::10/128
PersistentKeepalive = 25

[Peer]
PublicKey = <Second Client Private Key>
AllowedIPs = 10.0.0.20/32,fd00::20/128
Next we need to allow forwarding of incomming connections on the wg0 network interface and allow incomming connections on UDP port 51820 from the clients:
sudo ufw route allow in on wg0
sudo ufw allow 51820/udp
Among the WireGuard tools is the bash script /usr/bin/wg-quick. The script allows to easily bring up and shut down WireGuard interfaces. In case wg-quick finds a configuration file for the respective interface in the directory /etc/wireguard, it will create the interface, assign an IP address and routes or even run pre and post-up scripts.
Enable the WireGuard interface, and ensure it automatically gets restarted after boot:
sudo wg-quick up wg0
sudo systemctl enable wg-quick@wg0
Remember to stop (sudo wg-quick down wg0) and restart (sudo wg-quick up wg0) the interface every time the configuration file is changed.
Configure WireGuard client on macOS
The official WireGuard page contains installation instructions for may different operating systems. However, the macOS client can directly be downloaded from the App Store.
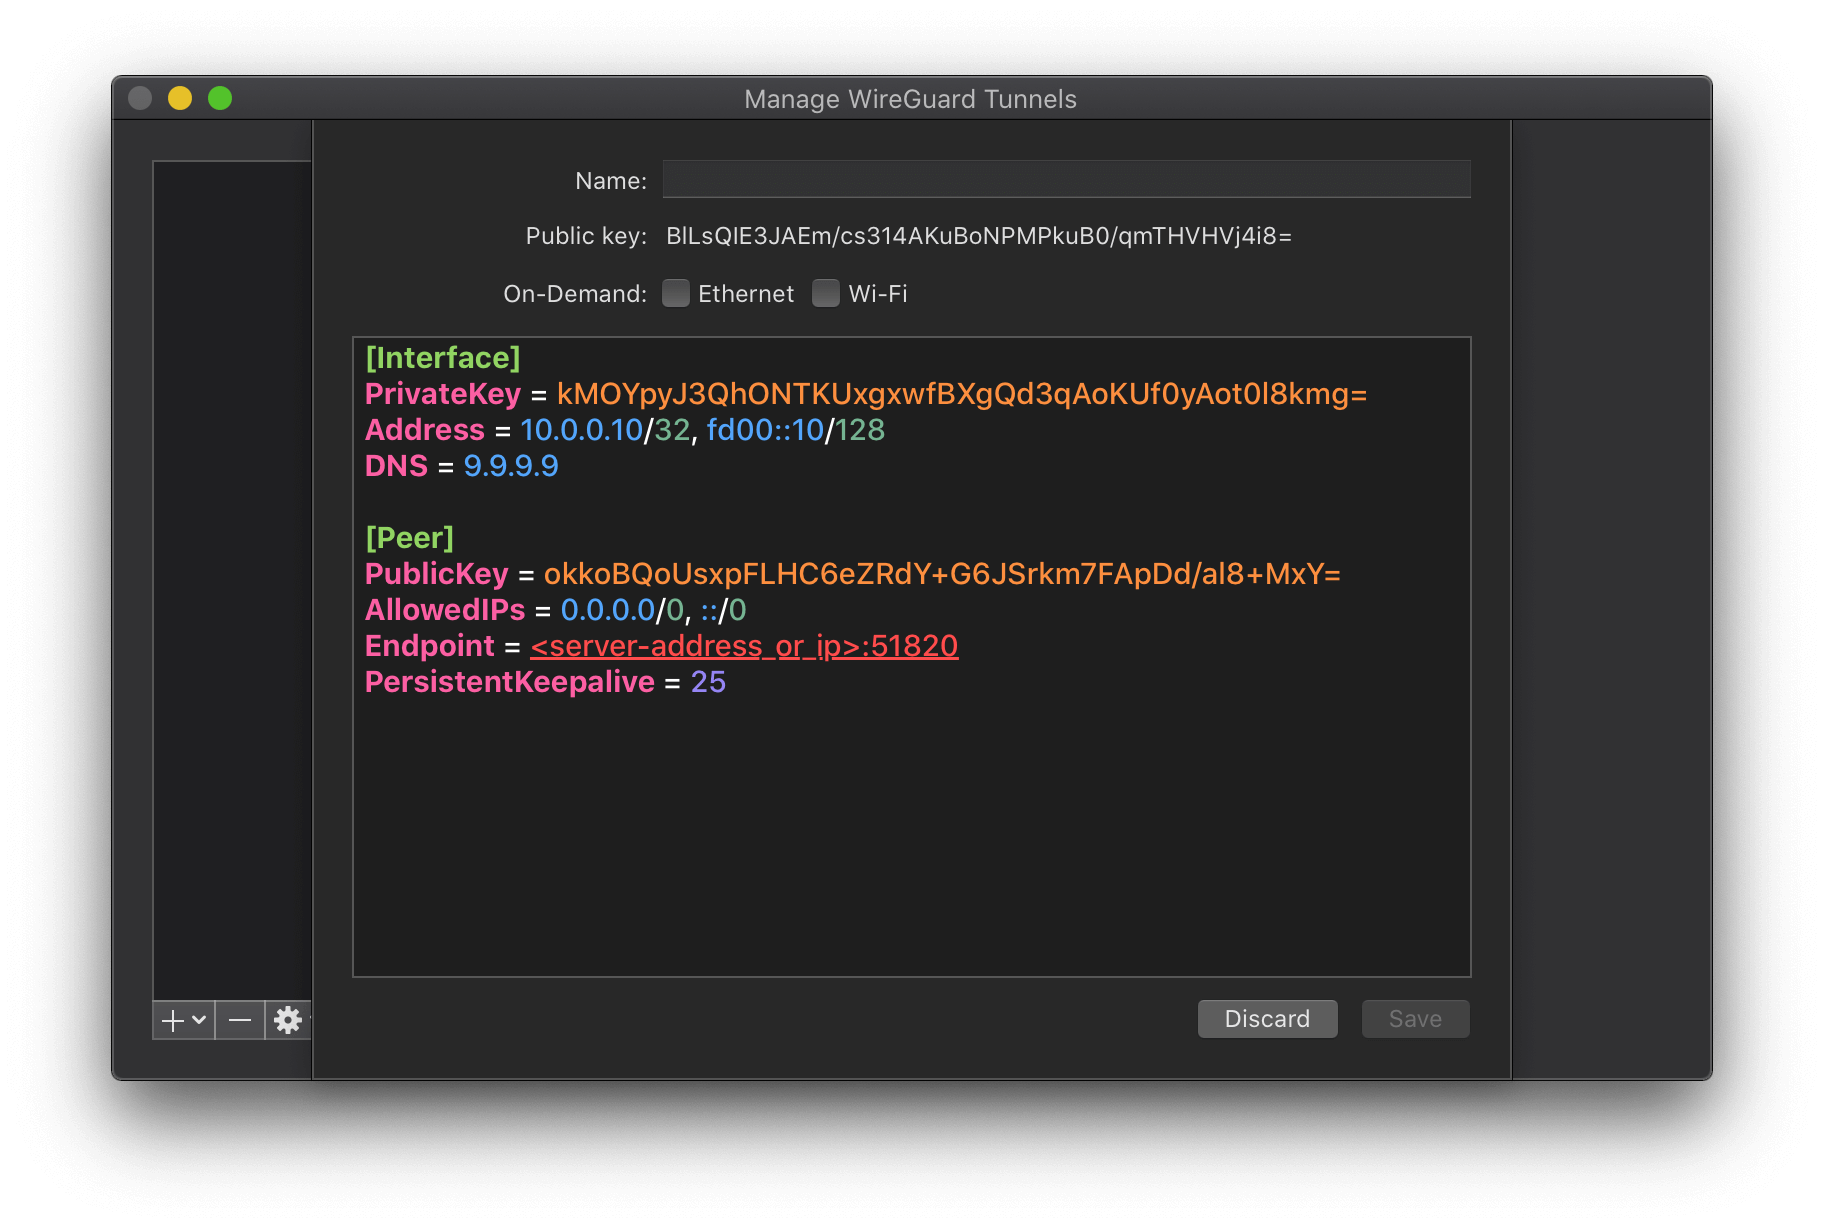
Once the client is installed, click Add Empty Tunnel.

A private and a public key are automatically generated and the client configuration is prefilled. Edit the configuration using the following tempalte.
[Interface]
PrivateKey = <Client Private Key>
# the static IPv4 and IPv6 address assigned to the client
Address = 10.0.0.10/32, fd00::10/128
# choose any DNS service like Quad9, Cloudflare, Google, etc.
DNS = 9.9.9.9

[Peer]
PublicKey = <Server Public Key>
# route all IPv4 and IPv6 addresses through the VPN
AllowedIPs = 0.0.0.0/0, ::/0
Endpoint = <server-address_or_ip>:51820
PersistentKeepalive = 25
Add new client peer to server
In order to allow the new client to connect to the WireGuard server, we need to add a new peer in its configuration file.
[Peer]
PublicKey = <Client Public Key>
AllowedIPs = 10.0.0.10/32,fd00::10/128
PersistentKeepalive = 25
That’s it, after restarting the interface, the configuration becomes active and the client should be able to connect the VPN.
Configure WireGuard client on iOS
Last but not least we will set up the WireGuard client on iOS. The iOS client can also be downloaded from the App Store. The set up process basically follows the same procedure.
Start by adding a new configuration from scratch.
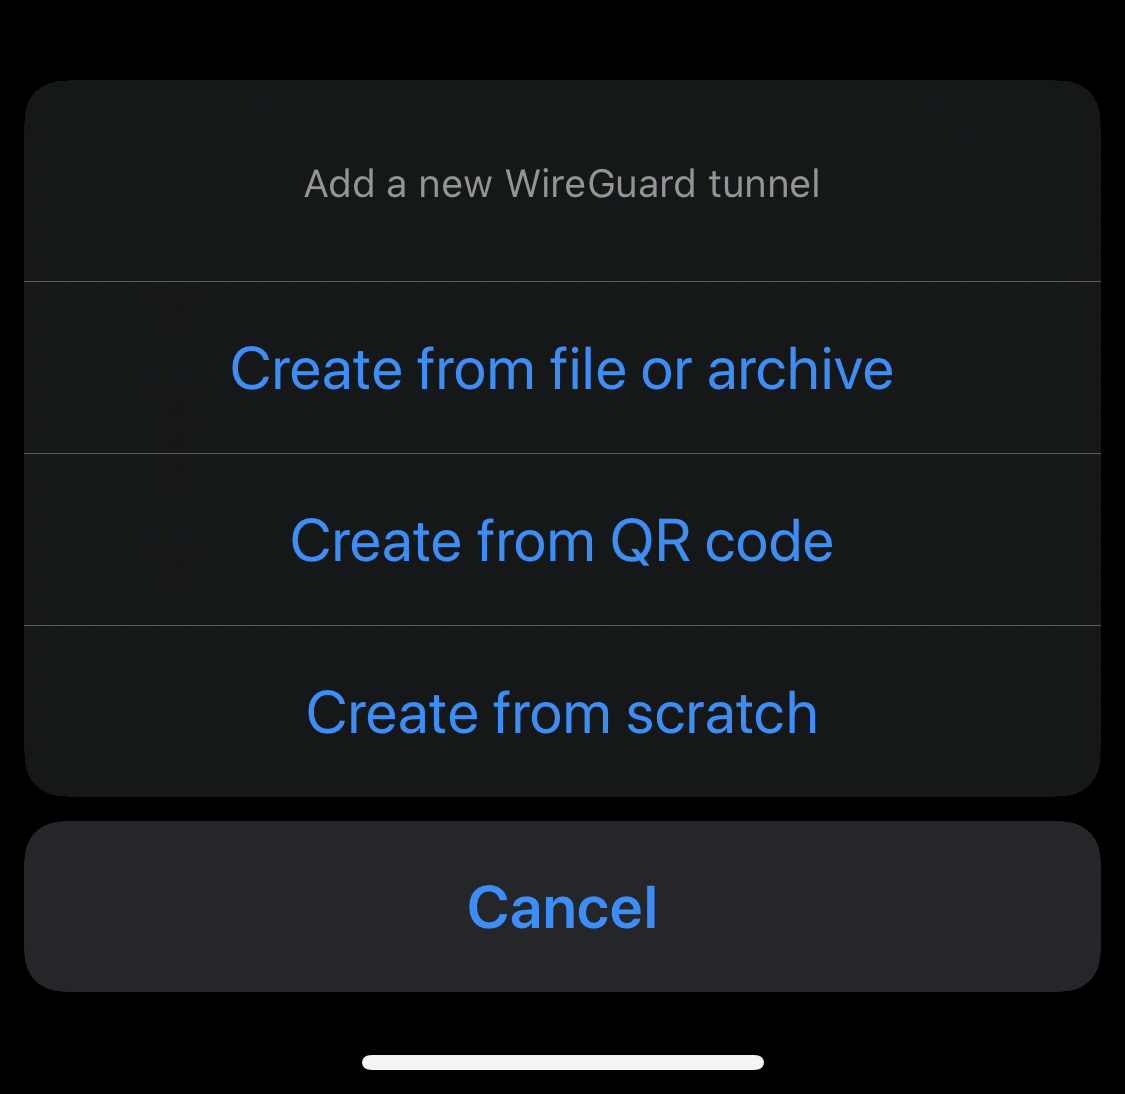
Instead of having to edit the configuration manually, iOS offers a graphical interface for this purpose.
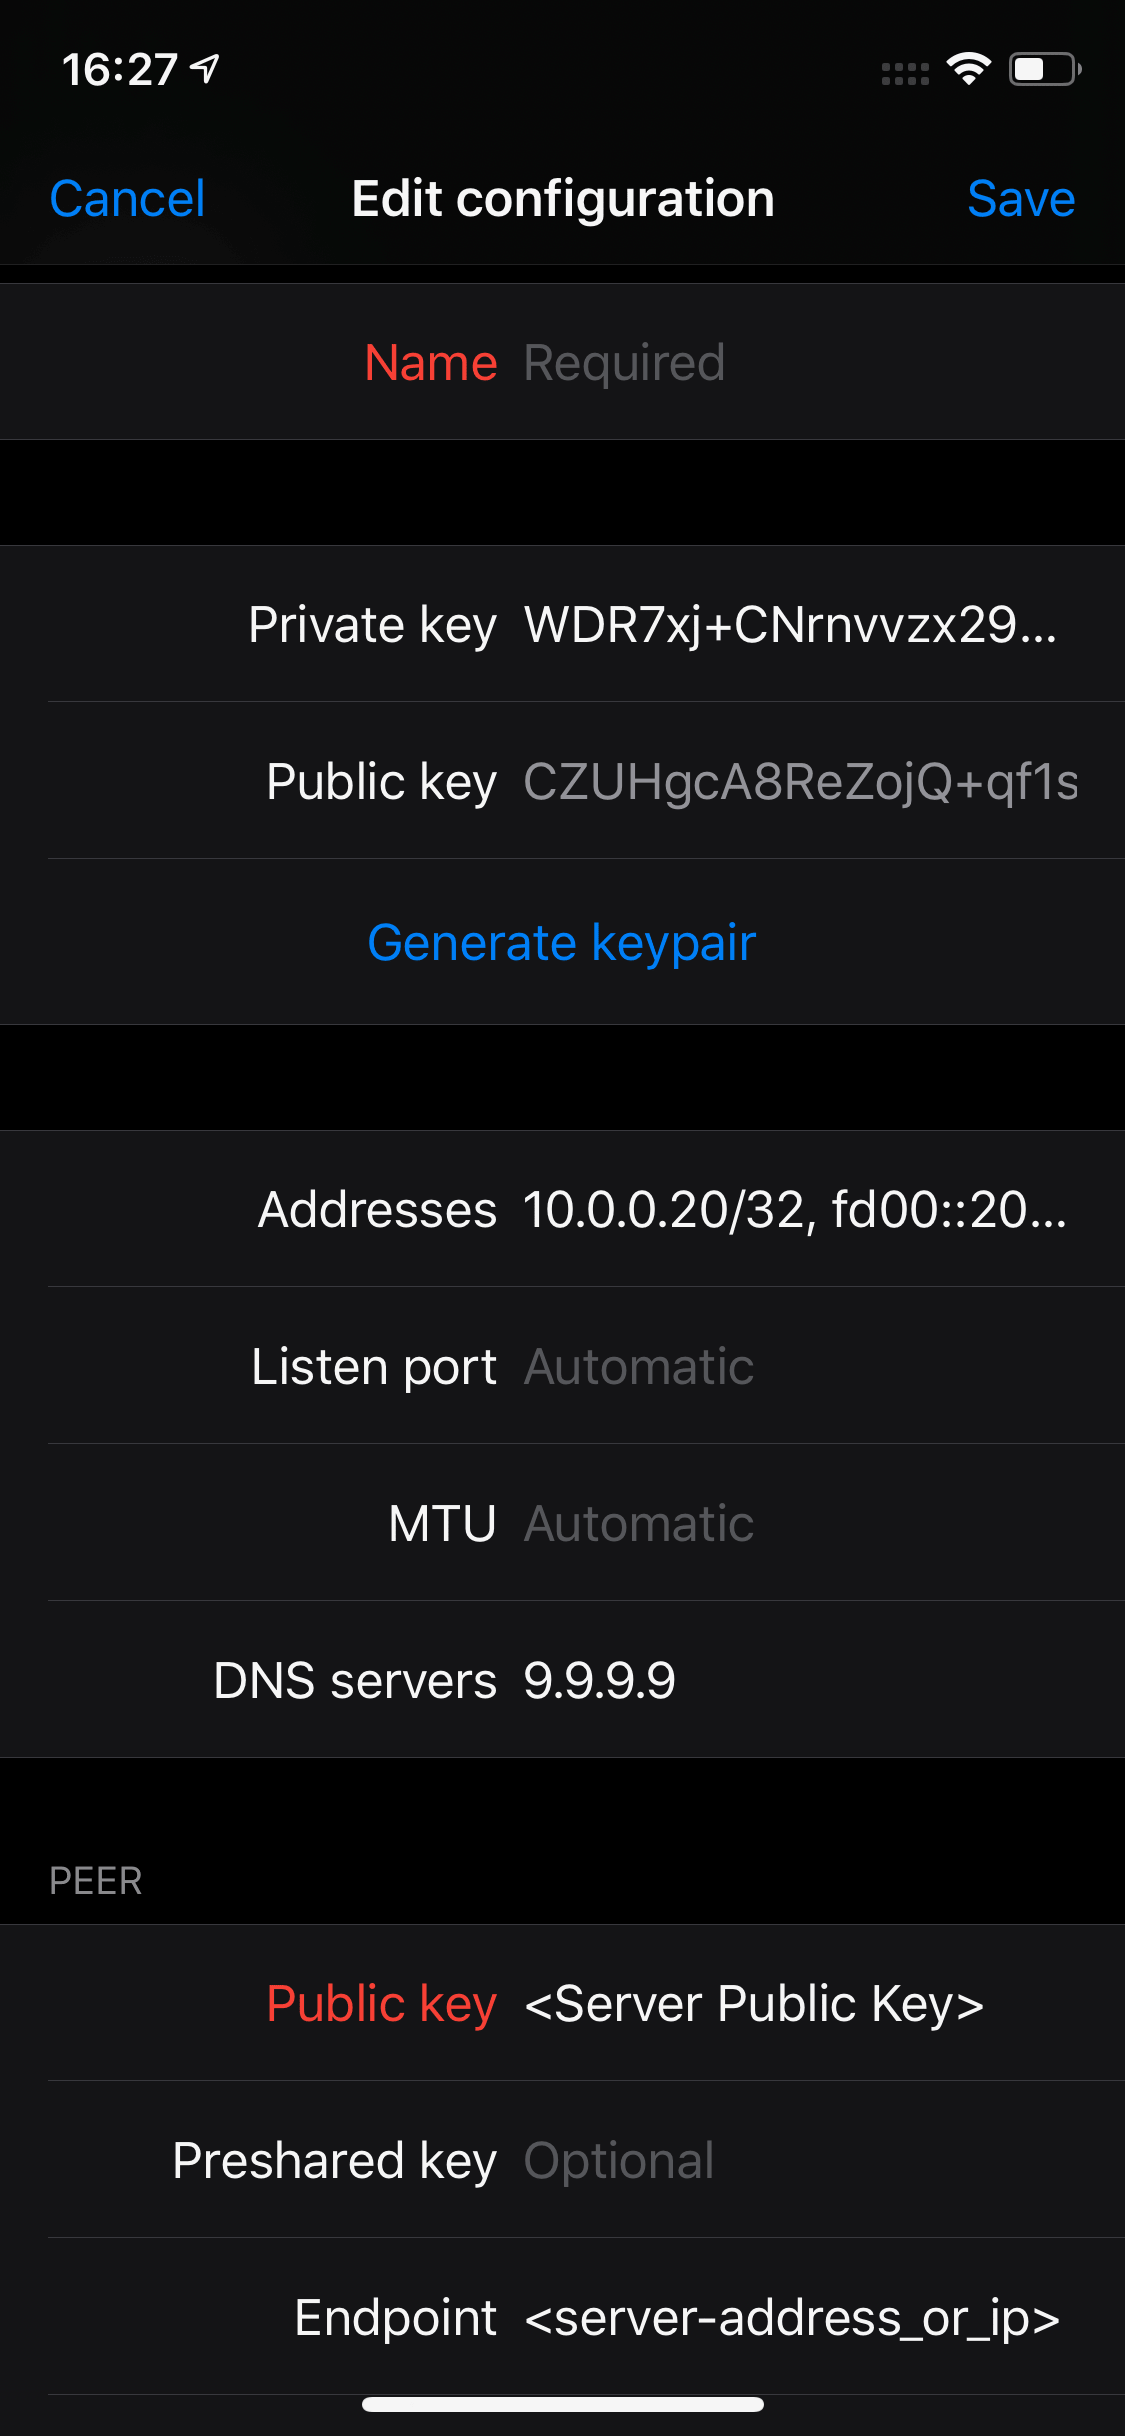
Add another client peer to server
To finalize our WireGuard VPN we add a second peer for the iOS client to the server configuration.
[Peer]
PublicKey = <Client Public Key>
AllowedIPs = 10.0.0.20/32,fd00::20/128
Note that in order to save some battery on the mobile device, PersistentKeepalive is turned off here for this client.
After restarting the WireGuard interface once again for the last time, your VPN is now ready to be used.
Conclusion
As you can see, setting up and running your own VPN with WireGuard is relatively easy once you know how to do it. So there’s no need to pay money to questionable VPN providers. Instead, you can run your own VPN server on a cheap virtual private server for little money (plus you can do a lot of other things with your own VPN).
If you think something in this guide is wrong or can be improved, please let me know!